DSPy is a framework for algorithmically optimizing LM prompts and weights.
When combined with Autoblocks, it becomes even more powerful.
Throughout this guide, we will show you how to set up a DSPy application and integrate Autoblocks tooling to further tune your AI application.
At the end of this guide, you’ll have:
- Set up a functioning DSPy application: Learn how to configure and run a DSPy application optimized for language model enhancement.
- Configured an Autoblocks Test Suite: Track experiments and evaluate your application using our easy-to-use CLI and SDK.
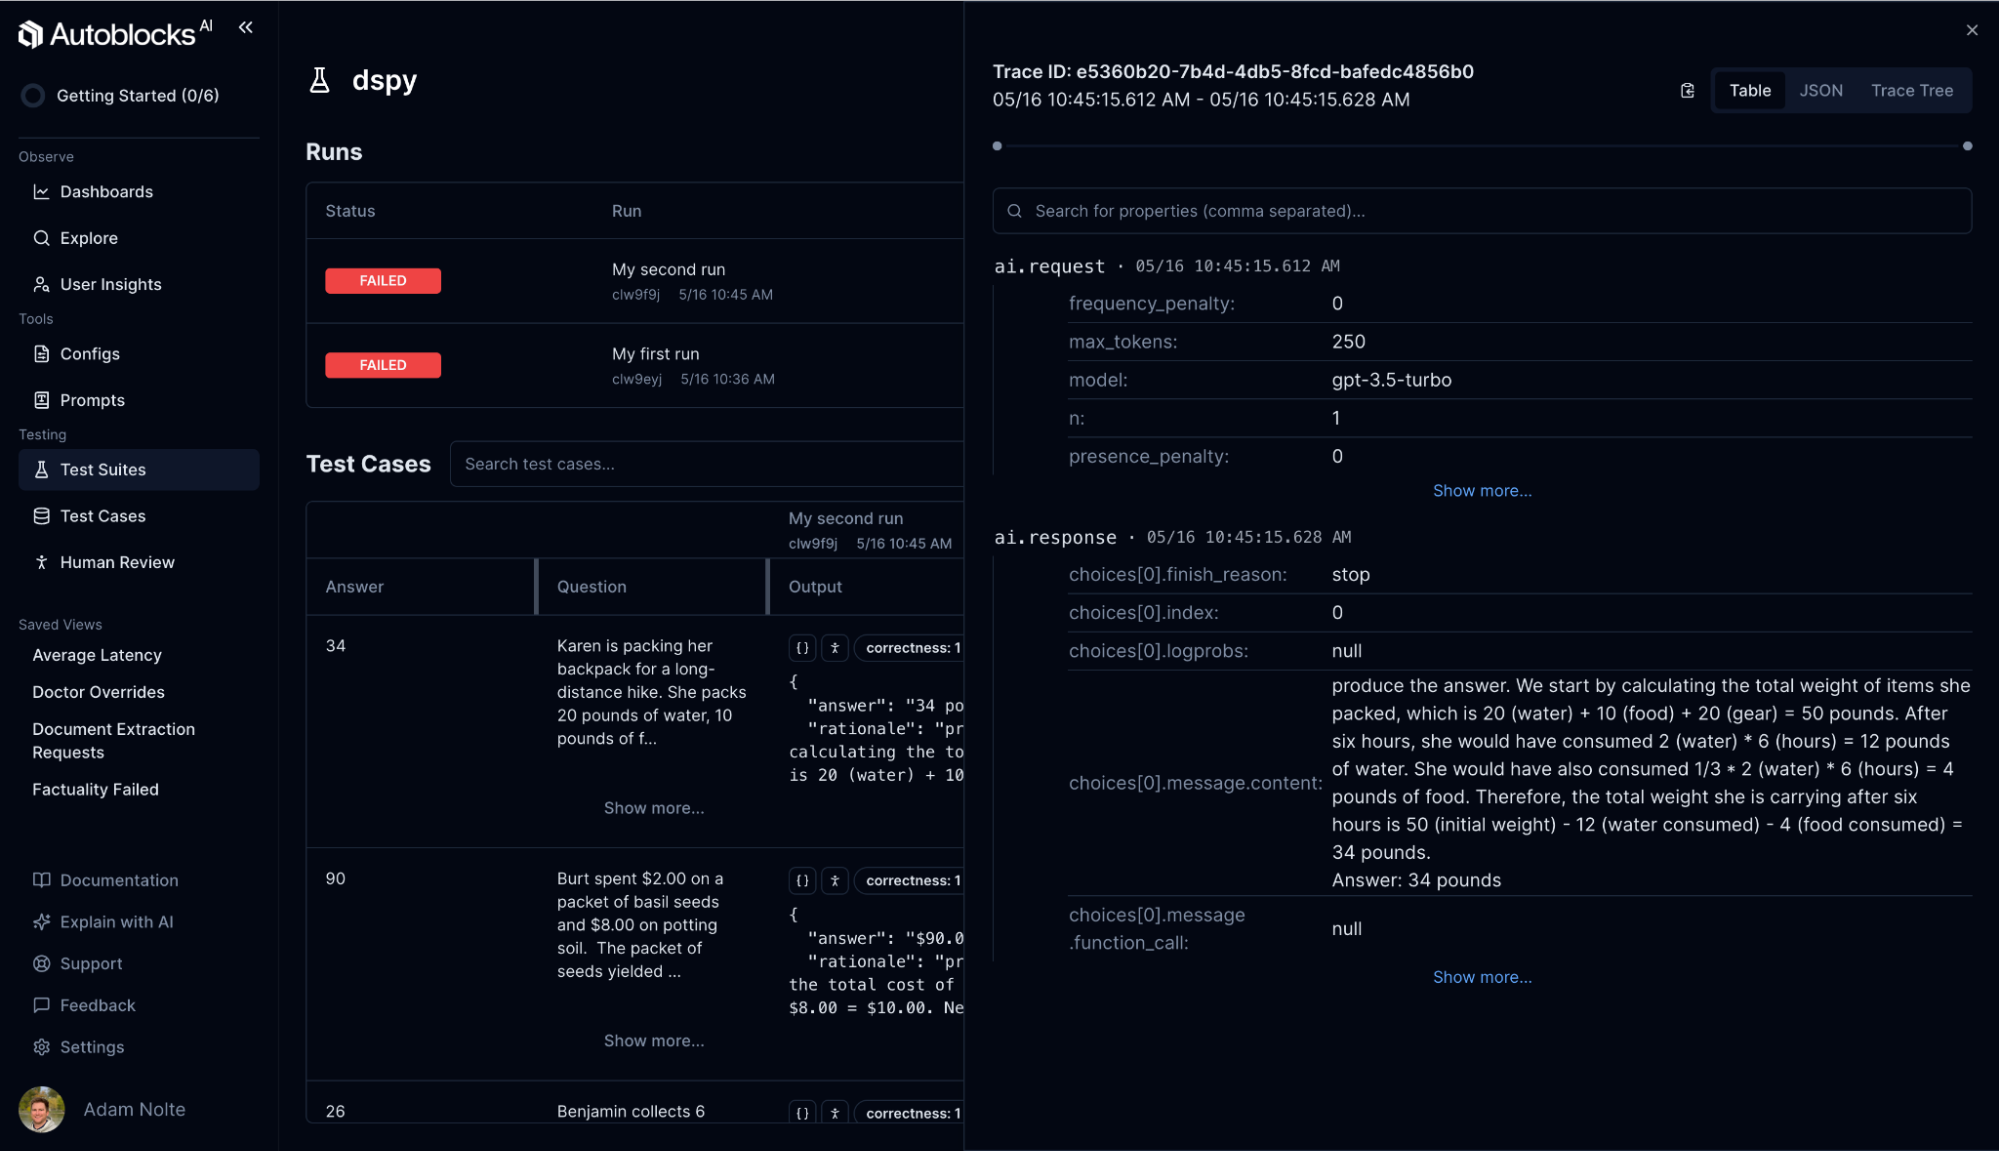
- Enabled Autoblocks Tracing: Gain insights into the underlying LLM calls to better understand what is happening under the hood.
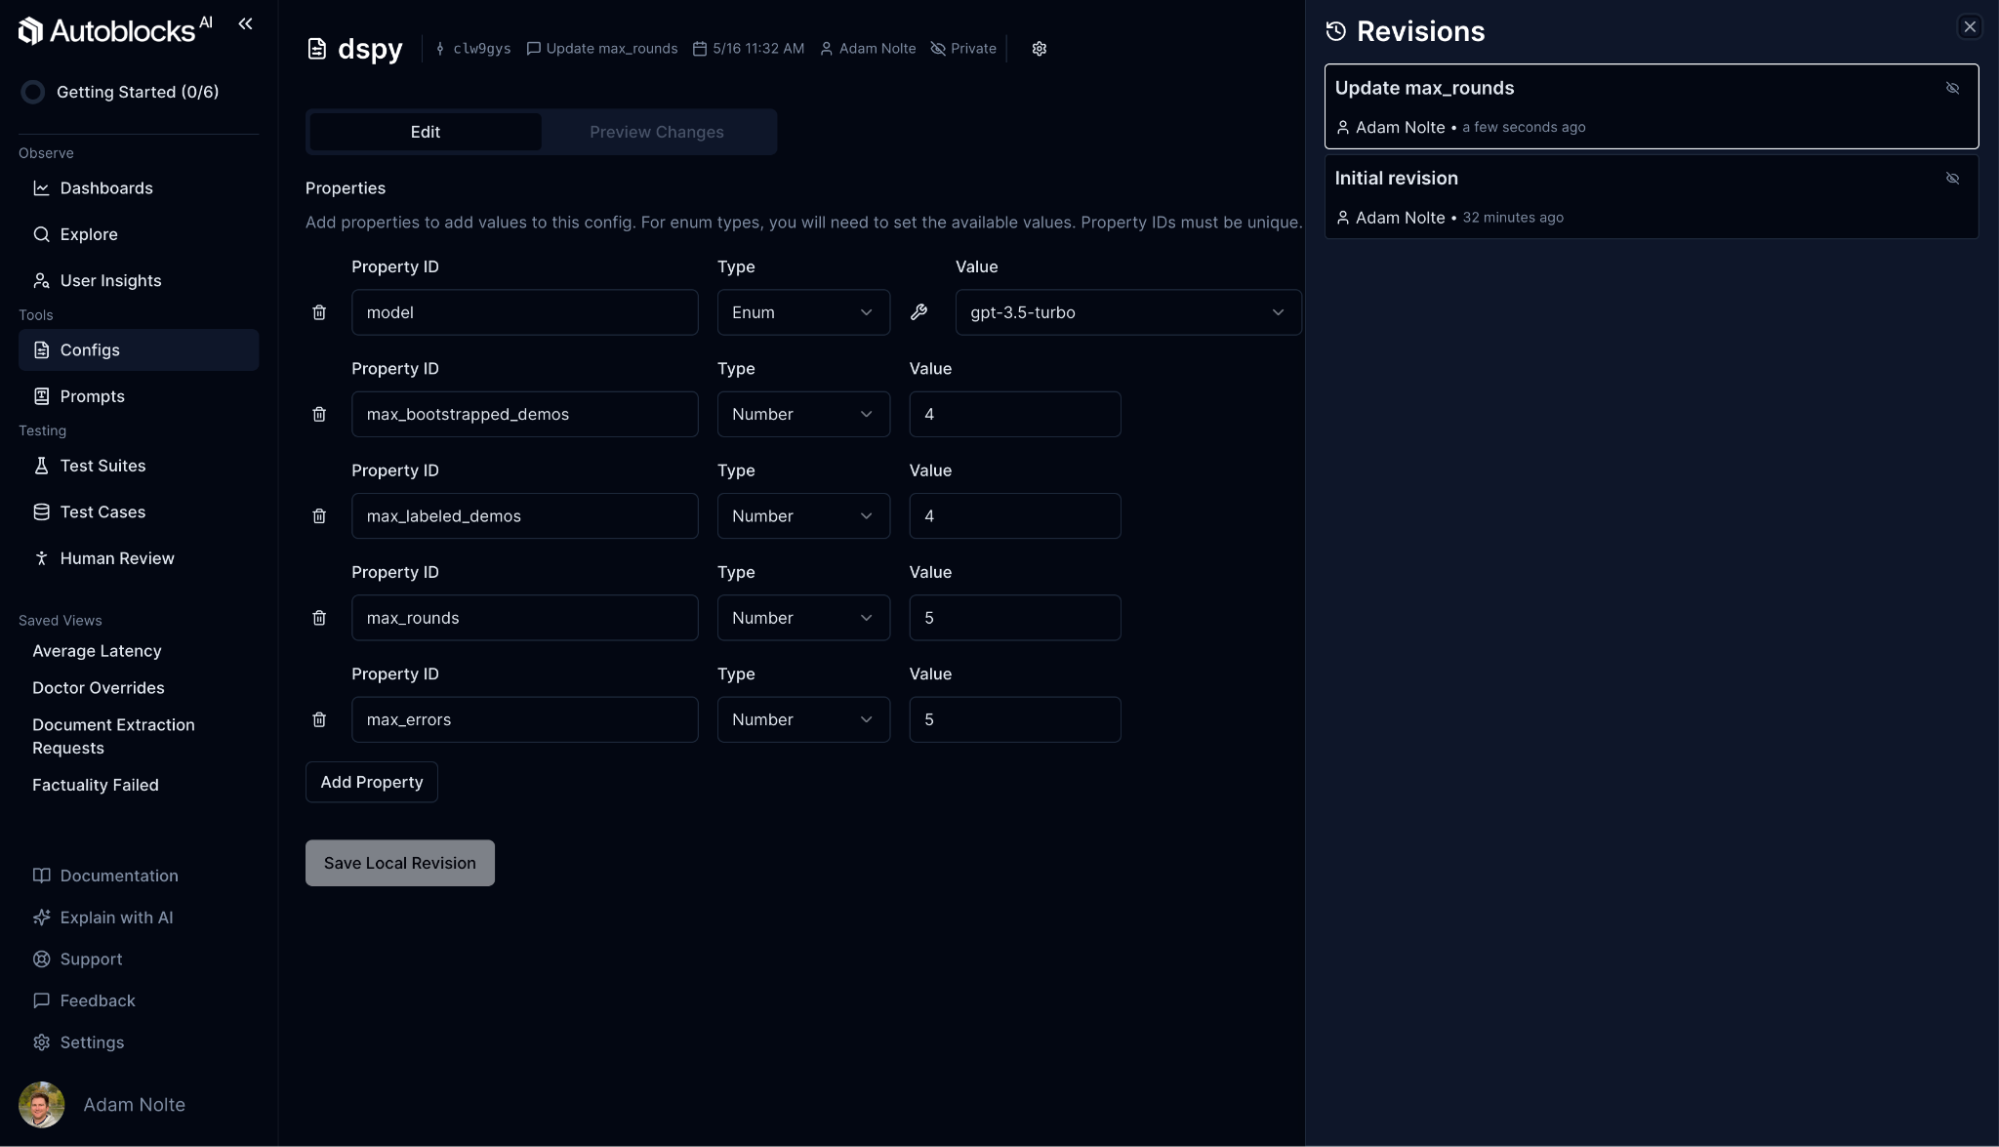
- Created an Autoblocks Config: Remotely and collaboratively manage and update your application’s settings to adapt to new requirements seamlessly.
Note: You can view the full working example here: https://github.com/autoblocksai/autoblocks-examples/tree/main/Python/dspy
Note: We will use Poetry throughout this guide, but you can use the dependency management solution of your choice.
Step 1: Set Up the DSPy App
We will use the DSPy minimal example as a base.
First, create a new poetry project:
poetry new autoblocks-dspy
Install DSPy:
poetry add dspy-ai
Create a file named run.py inside the autoblocks_dspy directory. This file sets up the language model, loads the GSM8K dataset, defines a Chain of Thought (CoT) program, and evaluates the program using DSPy.
# autoblocks_dspy/run.py

import dspy
from dspy.datasets.gsm8k import GSM8K, gsm8k_metric
from dspy.teleprompt import BootstrapFewShot
from dspy.evaluate import Evaluate

# Set up the LM
turbo = dspy.OpenAI(model='gpt-4-turbo', max_tokens=250)
dspy.settings.configure(lm=turbo)

# Load math questions from the GSM8K dataset
gsm8k = GSM8K()
gsm8k_trainset, gsm8k_devset = gsm8k.train[:10], gsm8k.dev[:10]

class CoT(dspy.Module):
    def __init__(self):
        super().__init__()
        self.prog = dspy.ChainOfThought("question -> answer")

    def forward(self, question: str):
        return self.prog(question=question)

# Set up the optimizer: we want to "bootstrap" (i.e., self-generate)
# 4-shot examples of our CoT program.
config = dict(max_bootstrapped_demos=4, max_labeled_demos=4)

# Optimize! Use the `gsm8k_metric` here.
# In general, the metric is going to tell the optimizer how well it's doing.
teleprompter = BootstrapFewShot(metric=gsm8k_metric, **config)
optimized_cot = teleprompter.compile(CoT(), trainset=gsm8k_trainset)

# Set up the evaluator, which can be used multiple times.
evaluate = Evaluate(
    devset=gsm8k_devset,
    metric=gsm8k_metric,
    num_threads=4,
    display_progress=True,
    display_table=0
)

def run():
    # Evaluate our `optimized_cot` program.
    evaluate(optimized_cot)
Now update the pyproject.toml file to include a start script. This makes it easy to run your DSPy application with a single command:
[tool.poetry.scripts]
start = "autoblocks_dspy.run:run"
Run poetry install again to register the script:
poetry install
Set your OpenAI API Key as an environment variable:
export OPENAI_API_KEY=...
Now you can run the application using Poetry:
poetry run start
You should see output in your terminal, indicating that you have successfully run your first DSPy application!

Step 2: Add Autoblocks Testing
Now let's add Autoblocks Testing to our DSPy application so we can declaratively define tests to track experiments and optimizations.
First, install the Autoblocks SDK:
poetry add autoblocksai
Update the run function in autoblocks_dspy/run.py to take a question as input and return the result. This prepares your function for testing:
# autoblocks_dspy/run.py

def run(question: str) -> dspy.Prediction:
    return optimized_cot(question=question)
Now we’ll add our Autoblocks test suite and test cases. Create a new file inside the autoblocks_dspy folder named evaluate.py. This script defines the test cases, evaluators, and test suite.
# autoblocks_dspy/evaluate.py

from dspy.datasets.gsm8k import GSM8K, gsm8k_metric
from dspy.primitives import Prediction
from dataclasses import dataclass
from autoblocks.testing.models import BaseTestCase
from autoblocks.testing.models import BaseTestEvaluator
from autoblocks.testing.models import Evaluation
from autoblocks.testing.models import Threshold
from autoblocks.testing.run import run_test_suite
from autoblocks.testing.util import md5

from autoblocks_dspy.run import run

# Load math questions from the GSM8K dataset
gsm8k = GSM8K()
gsm8k_devset = gsm8k.dev[:10]

@dataclass
class TestCase(BaseTestCase):
    question: str
    answer: str

    def hash(self) -> str:
        """
        This hash serves as a unique identifier for a test case throughout its lifetime.
        """
        return md5(self.question)

@dataclass
class Output:
    """
    Represents the output of the test_fn.
    """
    answer: str
    rationale: str

class Correctness(BaseTestEvaluator):
    id = "correctness"
    threshold = Threshold(gte=1)

    async def evaluate_test_case(
        self,
        test_case: TestCase,
        output: Output,
    ) -> Evaluation:
        metric = gsm8k_metric(gold=test_case, pred=Prediction(answer=output))
        return Evaluation(
            score=1 if metric else 0,
            threshold=self.threshold,
        )

def test_fn(test_case: TestCase) -> Output:
    prediction = run(question=test_case.question)
    return Output(
        answer=prediction.answer,
        rationale=prediction.rationale,
    )

def run_test():
    run_test_suite(
        id="dspy",
        test_cases=[
            TestCase(
                question=item["question"],
                answer=item["answer"],
            )
            for item in gsm8k_devset
        ],
        evaluators=[
            Correctness()
        ],
        fn=test_fn,
    )
Update the run script in pyproject.toml to point to your new test script:
[tool.poetry.scripts]
start = "autoblocks_dspy.evaluate:run_test"
Install the Autoblocks CLI following the guide here: https://docs.autoblocks.ai/cli/setup
Retrieve your local testing API key from the settings page (https://app.autoblocks.ai/settings/api-keys) and set it as an environment variable:
export AUTOBLOCKS_API_KEY=...
Run the test suite:
npx autoblocks testing exec -m "My first run" -- poetry run start
In your terminal you should see:

In the Autoblocks Testing UI (https://app.autoblocks.ai/testing/local), you should see your test suite as well as the results:

🎉 Congratulations on running your first Autoblocks test on your DSPy application!
Step 3: Log OpenAI Calls
To gain insights into the LLM calls DSPy is making under the hood, we can add the Autoblocks Tracer.
Update the autoblocks_dspy/run.py file to override the OpenAI client from DSPy. This script logs requests and responses to Autoblocks, helping you trace the flow of data through your AI application:
# autoblocks_dspy/run.py

import os
import uuid
import dspy
from dspy.datasets.gsm8k import GSM8K, gsm8k_metric
from dspy.teleprompt import BootstrapFewShot
from autoblocks.tracer import AutoblocksTracer

tracer = AutoblocksTracer(
    os.environ["AUTOBLOCKS_INGESTION_KEY"],
)

class LoggingOpenAI(dspy.OpenAI):
    """Extend the OpenAI class from DSPy to log requests and responses to Autoblocks."""

    def basic_request(self, prompt: str, **kwargs):
        trace_id = str(uuid.uuid4())
        tracer.send_event(
            "ai.request",
            trace_id=trace_id,
            properties={
                "prompt": prompt,
                **self.kwargs,
                **kwargs,
            },
        )
        response = super().basic_request(prompt=prompt, **kwargs)
        tracer.send_event(
            "ai.response",
            trace_id=trace_id,
            properties=response,
        )
        return response

# Set up the LM
turbo = LoggingOpenAI(model='gpt-3.5-turbo', max_tokens=250)
dspy.settings.configure(lm=turbo)

# Load math questions from the GSM8K dataset
gsm8k = GSM8K()
gsm8k_trainset = gsm8k.train[:10]

class CoT(dspy.Module):
    def __init__(self):
        super().__init__()
        self.prog = dspy.ChainOfThought("question -> answer")

    def forward(self, question):
        return self.prog(question=question)

# Set up the optimizer: we want to "bootstrap" (i.e., self-generate) 4-shot examples of our CoT program.
config = dict(max_bootstrapped_demos=4, max_labeled_demos=4)

# Optimize! Use the `gsm8k_metric` here. In general, the metric is going to tell the optimizer how well it's doing.
teleprompter = BootstrapFewShot(metric=gsm8k_metric, **config)
optimized_cot = teleprompter.compile(CoT(), trainset=gsm8k_trainset)

def run(question: str) -> dspy.Prediction:
    return optimized_cot(question=question)
Retrieve your Ingestion key from the settings page and set it as an environment variable:
export AUTOBLOCKS_INGESTION_KEY=...
Run your tests again:
npx autoblocks testing exec -m "My second run" -- poetry run start
Inside the Autoblocks UI, you can now open events for a test case to view the underlying LLM calls that DSPy made.

Step 4: Add Autoblocks Config
Next, you can add an Autoblocks Config to enable collaborative editing and versioning of the different configuration parameters for your application.
First, create a new config in Autoblocks (https://app.autoblocks.ai/configs/create)
Name your config dspy and set up the following parameters:
Parameter Name | Type | Default | Values |
|---|---|---|---|
model | enum | gpt-3.5-turbo | gpt-3.5-turbo, gpt-4, gpt-4-turbo |
max_bootstrapped_demos | number | 4 | |
max_labeled_demos | number | 4 | |
max_rounds | number | 1 | |
max_errors | number | 5 |
Create a file named config.py inside of the autoblocks_dspy directory. This script defines the configuration model in code using Pydantic and loads the remote config from Autoblocks.
# autoblocks_dspy/config.py

import pydantic
from autoblocks.configs.config import AutoblocksConfig
from autoblocks.configs.models import RemoteConfig

class ConfigValue(pydantic.BaseModel):
    model: str
    max_bootstrapped_demos: int
    max_labeled_demos: int
    max_rounds: int
    max_errors: int

class Config(AutoblocksConfig[ConfigValue]):
    pass

config = Config(
    value=ConfigValue(
        model="gpt-4-turbo",
        max_bootstrapped_demos=4,
        max_labeled_demos=4,
        max_rounds=10,
        max_errors=5,
    ),
)

config.activate_from_remote(
    config=RemoteConfig(
        id="dspy",
        # Note we are using dangerously use undeployed here
        # Once you deploy your config
        # you can update this to use a deployed version
        dangerously_use_undeployed_revision="latest"
    ),
    parser=ConfigValue.model_validate,
)
Update autoblocks_dspy/run.py to use the newly created config. This ensures your application uses the configuration parameters defined in Autoblocks:
# autoblocks_dspy/run.py

import os
import uuid
import dspy
from dspy.datasets.gsm8k import GSM8K, gsm8k_metric
from dspy.teleprompt import BootstrapFewShot
from autoblocks.tracer import AutoblocksTracer
from autoblocks_dspy.config import config

tracer = AutoblocksTracer(
    os.environ["AUTOBLOCKS_INGESTION_KEY"],
)

class LoggingOpenAI(dspy.OpenAI):
    """Extend the OpenAI class from DSPy to log requests and responses to Autoblocks."""

    def basic_request(self, prompt: str, **kwargs):
        trace_id = str(uuid.uuid4())
        tracer.send_event(
            "ai.request",
            trace_id=trace_id,
            properties={
                "prompt": prompt,
                **self.kwargs,
                **kwargs,
            },
        )
        response = super().basic_request(prompt=prompt, **kwargs)
        tracer.send_event(
            "ai.response",
            trace_id=trace_id,
            properties=response,
        )
        return response

# Set up the LM
turbo = LoggingOpenAI(model=config.value.model, max_tokens=250)
dspy.settings.configure(lm=turbo)

# Load math questions from the GSM8K dataset
gsm8k = GSM8K()
gsm8k_trainset = gsm8k.train[:10]

class CoT(dspy.Module):
    def __init__(self):
        super().__init__()
        self.prog = dspy.ChainOfThought("question -> answer")

    def forward(self, question):
        return self.prog(question=question)

# Optimize! Use the `gsm8k_metric` here. In general, the metric is going to tell the optimizer how well it's doing.
teleprompter = BootstrapFewShot(
    metric=gsm8k_metric,
    max_bootstrapped_demos=config.value.max_bootstrapped_demos,
    max_labeled_demos=config.value.max_labeled_demos,
    max_rounds=config.value.max_rounds,
    max_errors=config.value.max_errors,
)
optimized_cot = teleprompter.compile(CoT(), trainset=gsm8k_trainset)

def run(question: str) -> dspy.Prediction:
    return optimized_cot(question=question)
Run your tests!
npx autoblocks testing exec -m "My third run" -- poetry run start
You can now edit your config in the Autoblocks UI and maintain a history of all changes you’ve made.

What’s Next?
Congratulations on integrating DSPy and Autoblocks into your workflow!
With this robust setup, you can track and refine your AI applications effectively.
To further enhance your development process and foster collaboration across your entire team, consider integrating your application with a Continuous Integration (CI) system.
The video below demonstrates how any team member can tweak configurations and test your application within Autoblocks—without needing to set up a development environment. This capability not only simplifies the process but also ensures that your AI development is more accessible and inclusive.
About Autoblocks
Autoblocks enables teams to continuously improve their scaling AI-powered products with speed and confidence.
Product teams at companies of all sizes—from seed-stage startups to multi-billion dollar enterprises—use Autoblocks to guide their AI development efforts.
The Autoblocks platform revolves around outcomes-oriented development. It marries product analytics with testing to help teams laser-focus their resources on making product changes that improve KPIs that matter.
About DSPy
DSPy is a framework for algorithmically optimizing LM prompts and weights, especially when LMs are used one or more times within a pipeline.
